Quantcast
Channel: BUILDER'S ENGINEER
Viewing all 117 articles
Browse latest View live

BEAMS MOMENT OF INERTIA

$
0
0
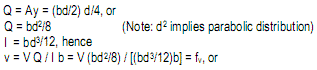
The formula for the moment of inertia I=∫(y^2)da reveals that the resistance of any differential area da increases with its distance y from the neutral axis squared, forming a parabolic distribution.  For a beam of rectangular cross-section, the resistance of top and bottom fibers with distance y = d/2 from the neutral axis is (d/2)^2.  Thus, the moment of inertia, as geometric resistance, is the volume of all fibers under a parabolic surface,  which is 1/3 the volume of a cube of equal dimensions, or I= bd ((d/2)^2)/3, or
the moment of inertia of a rectangular beam of homogeneous material.  A formal calculus derivation of this formula is given in Appendix A.  The section modulus gives only the maximum bending stress, but the moment of inertia gives the stress at any distance c from the neutral axis as f= Mc/I.  This is useful, for example, for bending elements of  asymmetrical cross-section, such as T- and L-shapes.

1  Bending stress distribution over beam cross-section
2  Moment of inertia visualized as volume under parabolic surface
3  T-bar with asymmetrical stress: max. stress at c2 from the neutral axis
4  Angle bar with asymmetrical stress distribution about x, y, and z-axes:  maximum resistance about x-axis and minimum resistance about z-axis

BEAMS MOMENT OF INERTIA

BEAMS SHEAR STRESS

$
0
0
The distribution of shear stress over the cross-section of beams is derived, referring to a beam part of length x marked on diagrams.  Even though horizontal and vertical shear are equal at any part of a beam, horizontal  shear stress is derived here because it is much more critical in wood due to horizontal fiber direction.

1  Beam, shear and bending diagrams with marked part of length x
2  Beam part with bending stress pushing and pulling to cause shear
3  Beam part with bending stress above an arbitrary shear plane

Let M be the differential bending moment between m and n.  M is equal to the shear area between m and n (area method), thus M = V x.  Substituting V x for M in the flexure formula f= M c /I yields bending stress f= V x c/I in terms of shear.  The differential bending stress between m and n pushes top and bottom fibers in opposite directions,  causing shear stress.  At any shear plane y1 from the neutral axis of the beam the sum of  shear stress above this plane yields a force F that equals average stress fy times the  cross section area A above the shear plane, F = A fy.  The average stress fy is found from similar triangles; fy relates to y as f relates to c, i.e., fy/y = f/c; thus fy = f y/c.  Since f= V x c/I, substituting V x c/I for f yields fy = (V x c/I) y/c = V x y/I.  Since F = A fy, it follows that  F = A V x y/I.  The horizontal shear stress v equals the force F divided by the area of the  shear plane;

V = F/(x b)  =  A V x y/(I x b)  =  V A y/(I b)  

The term A y is defined as Q, the first static moment of the area above the shear plane times the lever arm from its centroid to the neutral axis of the entire cross-section. Substituting Q for A y yields the working formula


v = horizontal shear stress.
Q = static moment (area above shear plane times distance from centroid of that area to
      the neutral axis of the entire cross-section
I = moment of Inertia of entire cross section
b = width of shear plane

The formula for shear stress can also be stated as shear flow q, measured in force per unit length (pound per linear inch, kip per linear inch, or similar metric units); hence


BEAMS SHEAR STRESS

SHEAR STRESS IN WOOD AND STEEL BEAMS

$
0
0
Based on the forgoing general derivation of shear stress, the formulas for shear stress in rectangular wood beams and flanged steel beams is derived here.  The maximum stress in those beams is customarily defined as fv instead of v in the general shear formula.

Shear at neutral axis of rectangular beam (maximum stress),
Note: this is the same formula derived for maximum shear stress before

Shear stress at the bottom of rectangular beam.  Note that y= 0 since the centroid of the area above the shear plane (bottom) coincides with the neutral axis of the entire section. Thus Q= Ay = (bd/2) 0 = 0, hence

v = V 0/(I b) = 0 = fv, thus
fv = 0 

Note: this confirms an intuitive interpretation that suggests zero stress since no fibers below the beam could resist shear

3  Shear stress at top of rectangular beam.  Note A = 0b = 0 since the depth of the shear area above the top of the beam is zero.  Thus  

Q = Ay = 0 d/2 = 0, hence v = V 0/(I b) = 0 = fv, thus
fv = 0

Note: this, too, confirms an intuitive interpretation that suggests zero stress since no fibers above the beam top could resist shear.

4
  Shear stress distribution over a rectangular section is parabolic as implied by the formula Q=b(d^2)/8 derived above.

5  Shear stress in a steel beam is minimal in the flanges and parabolic over the web.

The formula v = VQ/(I b) results in a small stress in the flanges since the width b of flanges is much greater than the web thickness.  However, for convenience, shear  stress in steel beams is computed as “average” by the simplified formula:


SHEAR STRESS IN WOOD I-BEAM

$
0
0
Since this is not a rectangular beam, shear stress must be computed by the general shear formula.  The maximum shear stress at the neutral axis as well as shear stress at the intersection between flange and web (shear plane As) will be computed.  The latter gives the shear stress in the glued connection.  To compare shear- and bending stress the latter is also computed.

Beam of L= 10 ft length, with uniform load w= 280plf (W = 2800 lbs)
Cross-section of wood I-beam


For the formula v= VQ/(Ib) we must find the moment of inertia of the entire cross-section. We could use the parallel axis theorem of Appendix A.  However, due to symmetry, a simplified formula is possible, finding the moment of inertia for the overall dimensions as rectangular beam minus that for two rectangles on both sides of the web.


Note c= 10/2 = 5 (half the beam depth due to symmetry)

Static moment Q of flange about the neutral axis:


Shear stress at flange/web intersection:


Static moment Q of flange plus upper half of web about the neutral axis


Maximum shear stress at neutral axis:


Note: Maximum shear stress reaches almost the allowable stress limit, but bendingstress is well below allowable bending stress because the beam is very short.  We can try at what span the beam approaches allowable stress, assuming L= 30 ft, using the same total load W = 2800 lbs to keep shear stress constant:

At 30 ft span bending stress is just over the allowable stress of 1450 psi.  This shows that in short beams shear governs, but in long beams bending or deflection governs.

SHEAR STRESS IN WOOD I-BEAM

SHEAR STRESS IN STEEL BEAM

$
0
0
This beam, supporting a column point load of 96 k over a door, is a composite beam consisting of a wide-flange base beam with 8x½ in plates welded to top and bottom flanges. The beam is analyzed with and without  plates.  As shown before, for steel beams shear stress is assumed to be resisted by the web only, computed as fv  = V/Av.  The base beam is a W10x49 [10 in (254 mm) nominal depth, 49 lbs/ft (6.77 kg/m) DL] with a moment of inertia Ixx= 272 in^4 (11322 cm^4).  Shear in the welds connecting the plates to the beam is found using the shear flow formula q = VQ/(I).

1  Beam of L= 6 ft (1.83 m) span with P = 96 k point load
2  Composite wide-flange beam W10x49 with 8x½ inch stiffener plates

Shear force V = P/2 = 96/2          V = 48 k
Bending moment M = 48(3)         M = 144 k’

Wide-flange beam 


Since the beam would fail in bending, a composite beam is used.

Composite beam

Since the shear force remains unchanged, the web shear stress is still ok.

Shear flow q in welded plate connection


Since there are two welds, each resists half the total shear flow


Note: in this steel beam, bending is stress is more critical than shear stress; this is typical for steel beams, except very short ones.

SHEAR STRESS IN STEEL BEAM

TYPICAL BEAM DIAGRAMS

$
0
0
Deflection, shear, and bending diagrams are shown here for typical beams. The beam with deflection and load diagrams are drawn on top with shear and bending diagrams shown below.  With experience, these diagrams may be drawn by visual inspection prior to computing.  This is useful to verify computations and develop an intuitive sense and visualization regarding shear and bending on beams.  The deflection diagram is drawn, visualizing the deflection of a thin board, flexible ruler, or similar device.  It is drawn grossly exaggerated to be visible.  The shear diagram is drawn at a convenient force scale left to right, starting with zero shear to the left of the beam.  Downward uniform load yields downward sloping shear.  Downward point loads are drawn as downward offset, and upward reactions yield upward offset.  Bending diagrams are drawn, considering the area method; namely, bending at any point is equal to the area of the shear diagram up to that point.  Both, shear and bending must be zero to the right of the right beam end. To satisfy this, requires a certain amount of forward thinking and, in complex cases, even working backward from right to left as well as left to right.

1  Cantilever beam with point load
2  Cantilever beam with uniform load
3  Cantilever beam with mixed load
4  Simple beam with point loads
5  Simple beam with uniform load
6  Simple beam with mixed load
7  Beam with one overhang and point load
8  Beam with one overhang and uniform load
9  Beam with one overhang and mixed load
10  Beam with two overhangs and point loads
11  Beam with two overhangs and uniform load
12  Beam with two overhangs and mixed load

Wind Load - Structural Design

$
0
0
1  Wind load on gabled building
2  Wind load on dome or vault
3  Protected buildings inside a city
4  Exposed tall building inside a city
5  Wind flow around and above exposed building
6  Wind speed amplified by building configuration

Wind channeled between buildings causes a Venturi effect of increased wind speed.  Air movement through buildings causes internal pressure that effects curtain walls and cladding design.  Internal pressure has a balloon-like effect, acting outward if the wind enters primarily on the windward side.  Openings on leeward or side walls cause inward pressure.  In tall buildings with fixed curtain wall the difference between outside wind pressure and interior pressure causes air movement from high pressure to low pressure. 

This causes air infiltration on the windward side and outflow on the leeward side.  In high-rise buildings, warm air moving from lower to upper levels causes pressures at top levels on the leeward face and negative suction on lower levels.  Wind pressure is based on the equation developed by Daniel Bernoulli (1700-1782).   For steady air flow of velocity V, the velocity pressure, q, on a rigid body is

q = pV^2 / 2
p = air density   (air weight divided by the acceleration of gravity g = 32.2 ft/sec2)
Air of 15°C at sea level weighs 0.0765 Ib/ft
3, which yields:
q = 0.00256V^2   (q in psf)

The American National Standards Institute (ANSI) Minimum design loads for buildings and other structures  (ANSI A58.1 - 1982), converted dynamic pressure to velocity pressure qz (psf) at height z as


Wind Load

Wind effect - Structural Design

$
0
0
A building in the path of wind causes wind pressure which in turn causes force, shear, and overturn moment at each level that must be resisted, following a load path to the foundations (wind wall pressure transfers to horizontal diaphragms, then to shear walls, finally to foundation).  Wind pressure times tributary area per level causes  lateral force per level.  Shear per level, the sum of wind forces above, defines required resistance.   Overturn moment per level is the sum of forces above times their height above the respective level.


1  Wind force, shear, and overturn moment per level

 Fx = wind force = wind pressure times tributary area per level exposed to wind
 VX = shear per level = sum of Fx  above
 Mx = overturn moment  = sum of all forces above times their distance above level x.

2 Overturn effect

3  Windward  pressure increase with height

4 Wind force

Fx = (windward pressure + leeward suction) times tributary area per level
(leeward wind suction is assumed constant for full height)
Fx = P A
P = wind pressure and suction in psf (Pa)
A = tributary area exposed to wind
(tributary area = building width times half the story height above and below)

5 Shear

Wind shear per level = sum of all wind forces above
Wind shear is the integration of wind forces above

6 Overturn moment

Overturn moment per level  = sum of all forces above times their distance
Overturn moment per level = integration of shear diagram above respective level


Seismic Design

$
0
0
Earthquakes are caused primarily by release of shear stress in seismic faults, such as the San Andreas fault, that separates the Pacific plate from the North American plate, two of the plates that make up the earth’s crust according to the plate tectonics theory.  Plates move with respect to each other at rates of about 2-5 cm per year, building up stress in the process.  When stress exceeds the soil’s shear capacity, the plates slip and cause earthquakes.  The point of slippage is called the hypocenter or focus, the point on the surface above is called the epicenter.  Ground waves propagate in radial pattern from the focus.  The radial waves cause shaking somewhat more vertical above the focus and more horizontal far away; yet irregular rock formations may deflect the ground waves in random patterns.  The Northridge earthquake of January 17, 1994 caused unusually strong vertical acceleration because it occurred under the city.

Occasionally earthquakes may occur within plates rather than at the edges.  This was the case with a series of strong earthquakes in New Madrid, along the Mississippi River in Missouri in 1811-1812.  Earthquakes are also caused by volcanic eruptions, underground explosions, or similar man-made events.

Buildings are shaken by ground waves, but their inertia tends to resists the movement which causes lateral forces.  The building mass (dead weight) and acceleration effects these forces.  In response, structure height and stiffness, as well as soil type effect the response of buildings to the acceleration.  For example, seismic forces for concrete shear walls (which are very stiff) are considered twice that of more flexible moment frames.  As an analogy, the resilience of grass blades  will prevent them from breaking in an earthquake; but when frozen in winter they would break because of increased stiffness.

The cyclical nature of earthquakes causes dynamic forces that are best determined by dynamic analysis.  However, given the complexity of dynamic analysis, many buildings of regular shape and height limits, as defined by codes, may be analyzed by a static force method, adapted from Newton’s law F= ma (Force = mass x acceleration).

1  Seismic wave propagation and fault rupture
2  Lateral slip fault
3 Thrust fault
4 Building overturn
5 Building shear
6  Bending of building (first mode)
7  Bending of building (higher mode)
E Epicenter
H Hypocenter

Structures - Design Response Spectrum

$
0
0
The IBC Design Response Spectrum correlate time period T and Spectral Acceleration, defining three zones.  Two critical zones are:  

T < TS          governs low-rise structures of short periods
T > TS          governs tall structures of long periods

where

T = time period of structure (T ~ 0.1 sec. per story - or per ASCE 7 table 1615.1.1)
TS = SDS/SD1  (See the following graphs for SDS and SD1)

Structures - Horizontal Floor and Roof Diaphragms

$
0
0
Horizontal floor and roof diaphragms transfer lateral load to walls and other supporting elements.  The amount each wall assumes depends if diaphragms are flexible or rigid.

1.  Flexible diaphragm

Floors and roofs with plywood sheathing are usually flexible; they transfer load, similar to simple beams, in proportion to the tributary area of each wall. Wall reactions R are computed based on tributary area of each wall. Required shear flow q (wall capacity)

2.  Rigid diaphragm

Concrete slabs and some steel decks are rigid; they transfer load in proportion to the relative stiffness of each wall.  Since rigid diaphragms experience only minor deflections under load they impose equal drift on walls of equal length and stiffness. For unequal walls reactions are proportional to a resistance factor r.
Structures - Horizontal Floor and Roof Diaphragms

Seismic Design, Eccentricity

$
0
0
Offset between center of mass and center of resistance causes eccentricity which causes torsion under seismic load.  The plans at left identify concentric and eccentric conditions:

1  X-direction concentric
    Y-direction eccentric

2  X-direction eccentric
    Y-direction eccentric

3  X-direction concentric
    Y-direction concentric

4  X-direction concentric
    Y-direction concentric

5  X-direction concentric
    Y-direction concentric

X-direction concentric
    Y-direction concentric

Note: Plan 5 provides greater resistance against torsion than plan 6 due to wider wall spacing Plan 6 provides greater bending resistance because walls act together as core and thus provide a greater moment of inertia.

Seismic Design, Eccentricity

ARCHITECTURAL STRUCTURES - GLOBAL MOMENT AND SHEAR

$
0
0
Global moments help to analyze not only a beam but also truss, cable or arch. They all resist global moments by a couple F times lever arm d:
The force F is expressed as T (tension) and C (compression) for beam or truss, and H (horizontal reaction) for suspension cable or arch, forces are always defined by the global moment and lever arm of resisting couple.  For uniform load and simple support, the maximum moment M and maximum shear V are computed as:
For other load or support conditions use appropriate formulas

Beam

Beams resist the global moment by a force couple, with lever arm of 2/3 the beam depth d; resisted by top compression C and bottom tension T.

Truss 

Trusses resist the global moment by a force couple and truss depth d as lever arm; with compression C in top chord and tension T in bottom chord.  Global shear is resisted by vertical and / or diagonal web bars. Maximum moment at mid-span causes maximum chord forces.  Maximum support shear causes maximum web bar forces.

Cable 

Suspension cables resist the global moment by horizontal reaction with sag f as lever arm.  The horizontal reaction H, vertical reaction R, and maximum cable tension T form an equilibrium vector triangle; hence the maximum cable tension is:

Arch 

Arches resist the global moment like a cable, but in compression instead of tension:
However, unlike cables, arches don’t adjust  their form for changing loads; hence, they assume bending under non-uniform load as product of funicular force and lever arm between funicular line and arch form (bending stress is substituted by conservative axial stress for approximate schematic design).

Portal Method For Rough Moment Frame Design

$
0
0
The Portal Method for rough moment frame design is based on these assumptions:

•  Lateral forces resisted by frame action
•  Inflection points at mid-height of columns
•  Inflection points at mid-span of beams
•  Column shear is based on tributary area
•  Overturn is resisted by exterior columns only

1.   Single moment frame (portal)
2.    Multistory moment frame
3. Column shear is total shear V distributed proportional to tributary area:
4.   Column moment = column shear x height to inflection point
5. Exterior columns resist most overturn, the portal method assumes they resist all
6. Overturn moments per level are the sum of forces above the level times lever arm of each force to the column inflection point at the respective level:
7. Beam shear = column axial force below beam minus column axial force above beam Level 1 beam shear:
Portal Method For Rough Moment Frame Design

Structures: Bending, Effect of Overhang

$
0
0
Bending moments can be greatly reduced, using the effect of overhangs.  This can be describe on the example of a beam but applies also to other bending members of horizontal, span subject to gravity load as well.  For a beam subject to uniform load with two overhangs, a ratio of overhangs to mid-span of 1:2.8 (or about 1/3) is optimal, with equal positive and negative bending moments.  This implies an efficient use of material because if the beam has a constant size – which is most common – the beam is used to full capacity on both, overhang and span.  Compared to the same beam with supports at both ends, the bending moment in a beam with two overhangs is about one sixth !  To a lesser degree, a single overhang has a similar effect. Thus, taking advantage of overhangs in a design may result in great savings and economy of resources.

1. Simple beam with end supports and uniform load
2. Cantilevers of about 1/3 the span equalize positive and negative bending moments and reduces them to about one sixth, compared to a beam of equal length and load with but with simple end support.

Structures: Bending, Effect of Overhang

BEAM OPTIMIZATION

$
0
0
Optimizing long-span girders can save scares resources.  The following are a few conceptual options to optimize girders.  Optimization for a real project requires careful evaluation of alternate options, considering  interdisciplinary aspects along with purely structural ones.

1  Moment diagram, stepped to reflect required resistance along girder
2  Steel girder with plates welded on top of flanges for increased resistance
3  Steel girder with plates welded below flanges for increased resistance
4  Reinforced concrete girder with reinforcing bars staggered as required
5  Girder of parabolic shape, following the bending moment distribution
1  Girder of tapered shape, approximating bending moment distribution

BEAM OPTIMIZATION

Gerber Beam

$
0
0
The Gerber beam is named after its inventor, Gerber, a German engineering professor at Munich. The Gerber beam has hinges at inflection points to reduce bending moments, takes advantage of continuity, and allows settlements without secondary stresses.  The Gerber beam was developed in response to failures, caused by unequal foundation settlements in 19th century railroad bridges.

1. Simple beams over three spans
2. Reduced bending moment in continuous beam
3. Failure of continuous beam due to unequal foundation settlement, causing the span to double and the moment to increase four times
4. Gerber beam with hinges at inflection points minimizes bending moments and avoids failure due to unequal settlement
Gerber Beam

Joist, Beam, Girder

$
0
0
Joists, beams, and girders can be arranged in  three different configurations: joists supported by columns or walls1; joists supported by beams that are supported by columns2; and joists supported by beams, that  are supported by girders, that are supported by columns3.  The relationship between joist, beam, and girder can be either flush or layered framing.  Flush framing, with top of joists, beams, and girders flush with each other, requires less structural depth but may require additional depth for mechanical systems.  Layered framing allows the integration of mechanical systems. With main ducts running between beams and secondary ducts between joists.  Further, flush framing for steel requires more complex joining, with joists welded or bolted into the side of beams to support gravity load. Layered framing with joists on top of beams with simple connection to prevent displacement only

2 Single layer framing: joists supported directly by walls
3  Double layer framing: joists supported by beams and beams by columns
4 Triple layer framing: joists supported by beams, beams by girders, and girders by columns
5 Flush framing: top of joists and beams line up May require additional depth for mechanical ducts
6 Layered framing: joists rest on top of beams Simpler and less costly framing May have main ducts between beams, secondary ducts between joists

A Joists
B Beam
C Girders
D Wall
E Column
F Pilaster
G Concrete slab on corrugated steel deck

Joist, Beam, Girder

Vierendeels Configurations

$
0
0
Vierendeels may have various configurations, including one-way and two-way spans. One-way girders may be simply supported or continuous over more than two supports. They may be planar or prismatic with triangular or square profile for improved lateral load resistance.  Some highway pedestrian bridges are of the latter type.  A triangular cross-section has added stability, inherent in triangular geometry.  It could be integrated with bands of skylights on top of girders.

When supports are provided on all sides, Vierendeel frames of two-way or three-way spans are possible options.  They require less depth, can carry more load, have less deflection, and resist lateral load as well as gravity load.  The two-way option is well suited for orthogonal plans; the three-way option adapts better to plans based on triangles, hexagons, or free-form variations thereof.

Moment resistant space frames for multi-story or high-rise buildings may be considered a special case of the Vierendeel concept.

1  One-way planar Vierendeel girder
2  One-way prismatic Vierendeel girder of triangular cross-section
3  One-way prismatic Vierendeel girder of square cross-section
4  Two-way Vierendeel space frame
5  Three-way Vierendeel space frame
6  Multi-story Vierendeel space frame

Vierendeels Configurations

Structures: Folded Plate

$
0
0
The effect of folding on folded plates can be visualized with a sheet of paper. A flat paper deforms even under its own weight. Folding the paper adds strength and stiffness; yet under heavy load the folds may buckle. To secure the folds at both ends increases stability against buckling.

1. Flat paper deforms under its own weight
2. Folding paper increases strength and stiffness
3. Paper buckling under heavy load
4. Secured ends help resist buckling
Structures: Folded Plate
Viewing all 117 articles
Browse latest View live